Semantic blog markup
The visual change of this blog recently also helped me to enrich the html markup with more semantics. Using the latest <header>, <section> or <footer> elements annotates the document structure but it does not tell what type of content is shown. Using microdata, you can even tell search engines what the content is about. There are four simple steps to help search engines and all major social networks to understand your content better.
The main tool used in this case is microdata. Microdata is a standard format which describes all kind of content on your page. The standard just describes the method how to describe your content, but not what types of content there is. The latter is done by schema.org, a collaborative effort from Google, Yahoo, and Microsoft.
Tag your page
Start with microdata to mark the <body> as a WebPage type. It’s quite
simple, as you just need to add these attributes to the <body> tag to enable
microdata:
<body itemscope itemtype="http://schema.org/WebPage">
The next step is to mark the post inside the <body> as a BlogPosting.
If you do not specifically have a blog, but rather a listing of press items or
news articles, you can also use Article as a content type. For this
content type (either a BlogPosting or an Article) there are some good-to-have
properties:
- Title (“name” in microdata)
- Text (“description” in microdata)
- Permalink (“url” in microdata)
- Publishes date (“datePublished” in microdata)
NB. A description could be any kind of text describing your blog posting’s text. My blog posts are split into a lead and a body. As such, I use the lead text as a description. Preferably you would even craft a special description, independent from the lead as this gives you much more power over your content.
All my blog posts are encapsuled in an <article> tag. This makes it quite
convenient to mark the article as a BlogPosting and mark the individual
properties:
<article itemscope itemtype="http://schema.org/BlogPosting">
    <header>
        <time pubdate itemprop="datePublished" datetime="2013-09-04T12:00:00+02:00" content="2013-09-04T12:00:00+02:00">
            September 2013
        </time>

        <h1 itemprop="name">
            <a href="/article/123/my-title" itemprop="url">My Title</a>
        </h1>
    </header>

    <section itemprop="description">
        <p>Lorem Ipsum Dolor</p>
    </section>
</article>
Add a meta description
For all Google results, it is important to craft your description such that Google does not need to scan your site itself. When it tries to guess the description, you often get poor results including the name of your site and navigation structure. So avoid it and just add the description from the microdata as meta tag too.
<meta name="description" content="Lorem Ipsum Dolor">
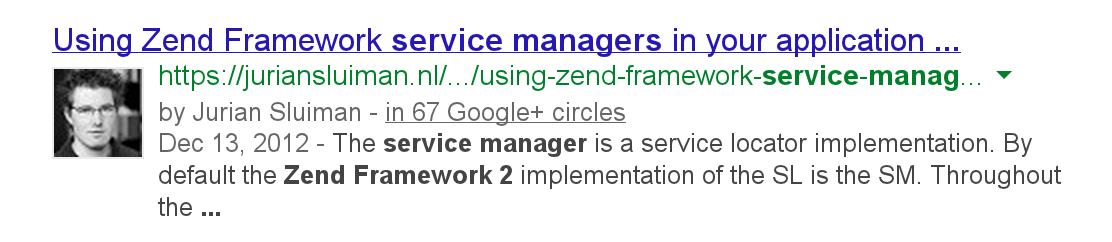
Make use of Google Authorship
If you are a single user writing content on your website, it is fairly easy to
increase click-through rates with Google Authorship, a tool to link your
blog to your Google+ profile. Search results will contain your profile picture
and a “by
To make use of Google Authorship, sign up for the programme and create a
specific about page. Somewhere at this page you must provide a link to your
Google+ profile with a query parameter “?rel=author” appended. Preferably you
should also semantically add the rel attribute to indicate other non-
Google related service this link points to something that represents you:
<a href="https://plus.google.com/102726331143136952916?rel=author" rel="me">me on Google+</a>
Enable Twitter cards and Facebook Open Graph metadata
Depending on the platform you like, sharing posts on either Facebook or Twitter (or both) increases your reach to potential readers enormously. The conversion from reach to clicks can be improved by helping your audience to decide if the text is worth to read. Both platforms have their own tools: Twitter uses cards and Facebook reads the data from Open Graph.
The data is all provided via meta tags in the <head> of your html document.
<!-- Twitter -->
<meta name="twitter:card" content="summary">
<meta name="twitter:author" content="@myusername">
<meta name="twitter:title" content="My Title">
<meta name="twitter:description" content="Lorem Ipsum Dolor">

<!-- Facebook -->
<meta property="og:type" content="article">
<meta property="og:title" content="My Title">
<meta property="og:description" content="Lorem Ipsum Dolor">
<meta property="og:url" content="http://mysite.com/article/123/my-title">
<meta property="og:locale" content="en-GB">
<meta property="article:published_time" content="2013-09-04T12:00:00+02:00">
The Twitter cards need to be validated before they are enabled, so you are sure the cards work as expected. Mind the Twitter meta tags use a name /content pair, the Facebook Open Graph tags require a property /content pair. Since Facebook does not require validation on beforehand, you can easily make a mistake and use a name/content pair for Facebook, which obviously wouldn’t work.
Summary
To finalize this post, there are many possibilities to add semantic markup to your existing html documents. By doing so, it will help crawlers in general to understand your content, helps improving search results (by both having the description and authorship) and increases click-through rates within social networks. Because each step itself is quite simple, there is not much effort required to enable all the bells and whistles to increase visitor traffic to your site.